Modes
Overview
A mode can be thought of as a viewer app configured to perform a specific task, such as tracking measurements over time, 3D segmentation, a guided radiological workflow, etc. Addition of modes enables application with many applications as each mode become a mini app configuration behind the scene.
Upon initialization the viewer will consume extensions and modes and build up the route desired, these can then be accessed via the study list, or directly via url parameters.
OHIF-v3 architecture can be seen in the following:
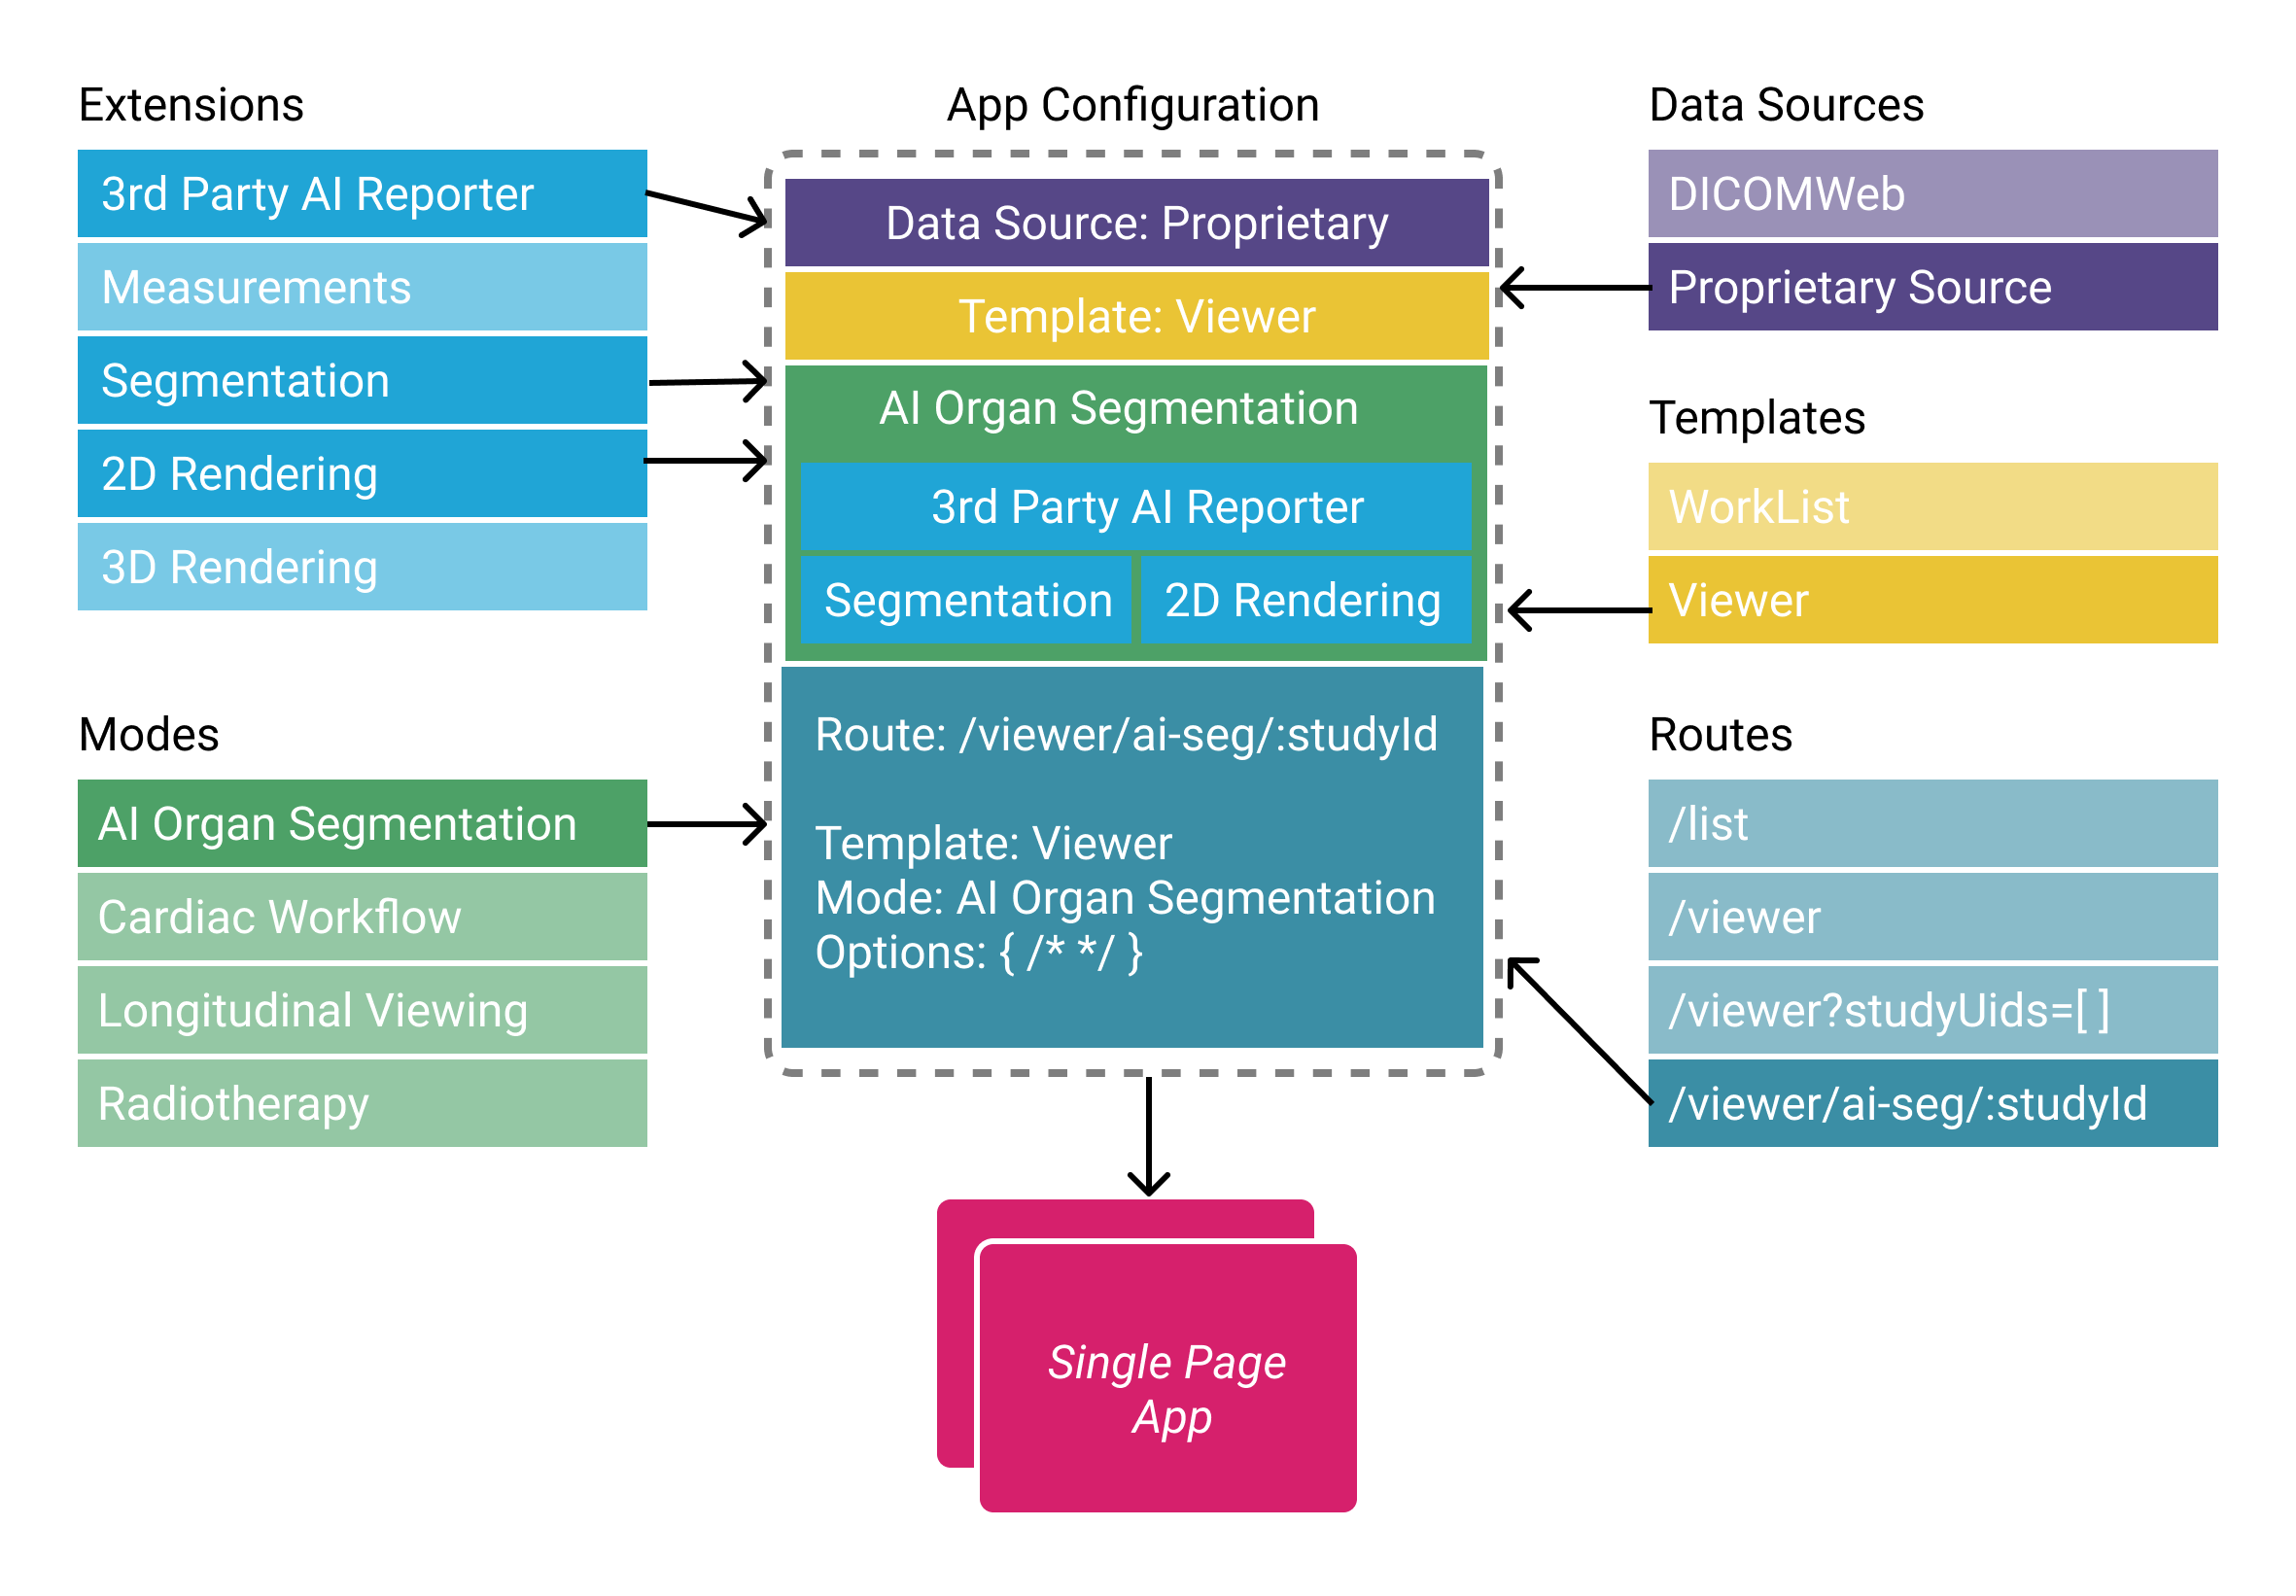
Note: Templates are now a part of “extensions” Routes are configured by modes and/or app
As mentioned, modes are tied to a specific route in the viewer, and multiple modes/routes can be present within a single application. This allows for tremendously more flexibility than before you can now:
- Simultaneously host multiple viewers with for different use cases from within the same app deploy.
- Make radiological viewers for specific purposes/workflows, e.g.:
- Tracking the size of lesions over time.
- PET/CT fusion workflows.
- Guided review workflows optimized for a specific clinical trial.
- Still host one single feature-rich viewer if you desire.
Anatomy
A mode configuration has a route name which is dynamically transformed into a
viewer route on initialization of the application. Modes that are available to a
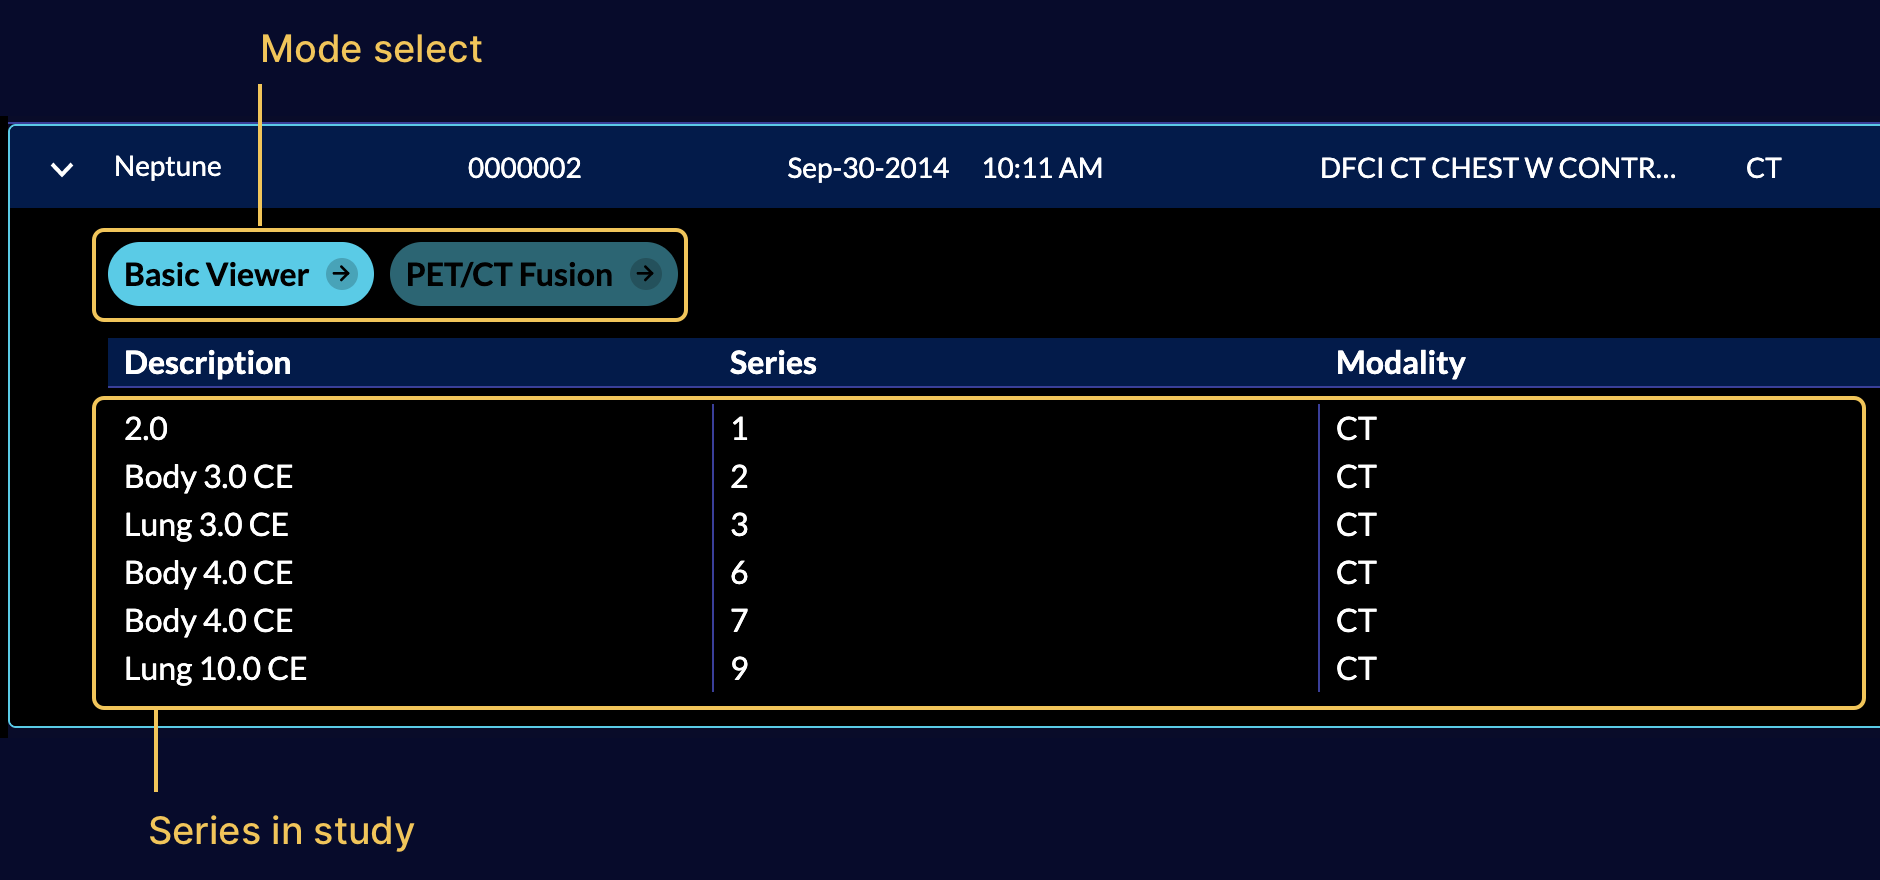
study will appear in the study list.
The mode configuration specifies which extensions the mode requires, which
LayoutTemplate to use, and what props to pass to the template. For the default
template this defines which side panels will be available, as well as what
viewports and which displaySets they may hang.
Mode's config is composed of these elements:
id: the modeidmodeFactory: the function that returns the mode specific configurationmodeInstance: An optional configuration used by the default modeFactory exported by the basic mode. This allows specifying or updating the default mode values.extensionDependencies: the list of extensions that the mode requires
that return a config object with certain properties, the high-level view of this config object is:
function modeFactory({modeConfiguration}) {
  return { ...this.modeInstance, ...modeConfiguration };

}

const mode = {
  id,
  modeFactory,
  modeInstance: {
    id: '',
    version: '',
    hide: true,
    displayName: '',
    onModeEnter: () => {},
    onModeExit: () => {},
    validationTags: {},
    isValidMode: () => {},
    routes: [
      {
        path: '',
        init: () => {},
        layoutInstance: {
          id,
          props: {
            leftPanels: [],
            leftPanelResizable: true,
            rightPanels: [],
            rightPanelClosed: true,
            rightPanelResizable: true,
            viewports: [],
          },
        },
        layoutTemplate: function() { return this.layoutInstance },
      },
    ],
    extensions: extensionDependencies,
    hangingProtocol: [],
    sopClassHandlers: [],
    hotkeys: [],
    nonModeModalities: [],
    modeModalities: [],
  },
  extensionDependencies,
};

export default mode;
| Property | Description |
|---|---|
id | unique mode id used to refer to the mode |
hide | Set to true to hide this mode on the worklist, but allow it in the path |
displayName | actual name of the mode being displayed for each study in the study summary panel |
onModeEnter | hook is called when the mode is entered by the specified route |
onModeExit | hook is called when the mode exited |
validationTags | validationTags |
isValidMode | Checks if the mode is valid for a study |
routes | route config which defines the route address, and the layout for it |
extensionDependencies | extensions needed by the mode |
hanging protocol | list of hanging protocols that the mode applies initially, choosing the highest scoring match |
sopClassHandlers | list of SOPClass modules needed by the mode |
hotkeys | hotkeys |
modeModalities | If non-empty, then the default isValidMode will only return true when the modalities list has all of the elements of one of the mode modalities. Eg [ [CT,PT], [MR,PT] ]` would mean that the mode supports a CT AND a PT, OR an MR and a PT |
nonModeModalities | Enable the mode if the modalities list contains a modality OTHER than those in the array |
enableSegmentationEdit | Boolean to skip the segmentation edit capabilities |
toolbarSections | An object containing toolbar section definitions to register |
Extending Modes
The basic mode provides support for creating mode extensions without having
to redeclare the entire mode. See longitudinal/src/index.ts for an example
mode that builds on top of the basic mode. Also see basic/src/index.tsx for
some default functions which can be used to create your own modes. Doing a mode
this way makes the definition of new modes based on your existing mode much easier,
and the upgrade to new versions of modes tends to be more consistent.
Consuming Extensions
As mentioned in the Extensions section, in OHIF-v3
developers write their extensions to create reusable functionalities that later
can be used by modes. Now, it is time to describe how the registered
extensions will get utilized for a workflow mode via its id.
Each mode has a list of its extensions dependencies which are the
the extension name and version number. In addition, to use a module element you can use the
${extensionId}.${moduleType}.${element.name} schema. For instance, if a mode
requires the left panel with name of AIPanel that is added by the
myAIExtension via the following getPanelModule code, it should address it as
myAIExtension.panelModule.AIPanel inside the mode configuration file. In the
background OHIF will handle grabbing the correct panel via ExtensionManager.
import PanelAI from './PanelAI.js';

function getPanelModule({
  commandsManager,
  extensionManager,
  servicesManager,
}) {
  const wrappedAIPanel = () => {
    return (
      <PanelAI
        commandsManager={commandsManager}
        servicesManager={servicesManager}
      />
    );
  };

  return [
    {
      name: 'AIPanel',
      iconName: 'list-bullets',
      iconLabel: '',
      label: 'AI Panel',
      isDisabled: studies => {}, // optional
      component: wrappedAIPanel,
    },
  ];
}
Now, let's look at a simplified code of the basic viewer mode which consumes various functionalities
from different extensions.
const extensionDependencies = {
  '@ohif/extension-default': '^3.0.0',
  '@ohif/extension-cornerstone': '^3.0.0',
  '@ohif/extension-measurement-tracking': '^3.0.0',
};

const id = 'viewer';
const version = '3.0.0';

function modeFactory({ modeConfiguration }) {
  return {
    id,
    // ...
    routes: [
      {
        // ...
        layoutTemplate: ({ location, servicesManager }) => {
          return {
            id: ohif.layout,
            props: {
              leftPanels: ['@ohif/extension-measurement-tracking.panelModule.seriesList'],
              rightPanels: ['@ohif/extension-measurement-tracking.panelModule.trackedMeasurements'],
              viewports: [
                {
                  namespace: '@ohif/extension-measurement-tracking.viewportModule.cornerstone-tracked',
                  displaySetsToDisplay: ['@ohif/extension-default.sopClassHandlerModule.stack'],
                },
              ],
            },
          };
        },
      },
    ],
    extensions: extensionDependencies,
    hangingProtocol: ['@ohif/extension-default.hangingProtocolModule.petCT'],
    sopClassHandlers: ['@ohif/extension-default.sopClassHandlerModule.stack'],
    // ...
  };
}

const mode = {
  id,
  modeFactory,
  extensionDependencies,
}

export default mode
Routes
routes config is an array of route settings, and the overall look and behavior
of the viewer at the designated route is defined by the layoutTemplate and
init functions for the route. We will learn more about each of the above
properties inside the route documentation
HangingProtocols
Currently, you can pass your defined hanging protocols inside the
hangingProtocols property of the mode's config. If you specify the hanging protocol
explicitly by its name (only string and not array), it will be THE hanging protocol
that the mode runs with. However, if you specify an array of hanging protocols,
they will get ranked based on the displaySetSelector requirements and the winner
will be the hanging protocol that the mode runs with.
SopClassHandlers
Mode's configuration also accepts the sopClassHandler modules that have been
added by the extensions. This information will get used to initialize DisplaySetService with the provided SOPClass modules which
handles creation of the displaySets.
Hotkeys
hotkeys is another property in the configuration of a mode that can be defined
to add the specific hotkeys to the viewer on the mode route. Additionally, the
name under which the hotkeys are stored can be configured as hotkeyName.
This allows user customization of the mode specific hotkeys.
// default hotkeys
import { utils } from '@ohif/ui';

const { hotkeys } = utils;

const myHotkeys = [
  {
    commandName: 'setToolActive',
    commandOptions: { toolName: 'Zoom' },
    label: 'Zoom',
    keys: ['z'],
    isEditable: true,
  },
  {
    commandName: 'scaleUpViewport',
    label: 'Zoom In',
    keys: ['+'],
    isEditable: true,
  },
]

function modeFactory() {
  return {
    id: '',
    displayName: '',
    /*
    ...
    */
    hotkeys: {
      // The name in preferences to use for this set of hotkeys
      // Allows defining different sets for different modes
      name: 'custom-hotkey-name',
      // And the actual custom values here.
      hotkeys:[..hotkeys.defaults.hotkeyBindings, ...myHotkeys]
    },
  }
}

// exports
Registration
Similar to extension registration, viewer will look inside the pluginConfig.json to
find the modes to register.
// Simplified version of the `pluginConfig.json` file
{
  "extensions": [
    {
      "packageName": "@ohif/extension-cornerstone",
      "version": "3.4.0"
    },
    // ...
  ],
  "modes": [
    {
      "packageName": "@ohif/mode-longitudinal",
      "version": "3.4.0"
    }
  ]
}
You SHOULD NOT directly register modes in the pluginConfig.json file.
Use the provided cli to add/remove/install/uninstall modes. Read more here
The final registration and import of the modes happen inside a non-tracked file pluginImport.js (this file is also for internal use only).
You can stack multiple panel components on top of each other by providing an array of panel components in the rightPanels or leftPanels properties.
For instance we can use
rightPanels: [[dicomSeg.panel, tracked.measurements], [dicomSeg.panel, tracked.measurements]]
This will result in two panels, one with dicomSeg.panel and tracked.measurements and the other with dicomSeg.panel and tracked.measurements stacked on top of each other.
APP Configuration of Modes
Modes based on the basic mode allow for customization using the immutability-helper
api within the app-config.js file as specified by the build process. For example,
to list the basic mode by default, and hide the longitudinal mode, the following
configuration from config/kheops.js can be used:
... app config file
  modesConfiguration: {
    '@ohif/mode-basic': {
      hide: { $set: false },
      displayName: { $set: 'Basic' },
    },
    '@ohif/mode-longitudinal': {
      hide: { $set: true },
    },
  },
Default Modes
There are a number of modes provided in a default OHIF installation. These are described here, along with some amount of information about extending/configuration of those modes.
Modes which are loaded by default, but which are hidden can be activated by
using a direct URL launch. For example, to show a study in the basic mode,
use the URL for the longitudinal mode, and replace the /viewer with /basic
Basic (NOT Basic Viewer, which got assigned to longitudinal)
The basic mode is a mode that demonstrates the base capabilities of the OHIF system, without including features such as longitudinal tracking, segmentation editing or other custom capabilities. The left hand panel uses the study browser thumbnails without tracking, and the right hand panel uses the basic segmentation panel and the measurements without tracking (longitudinal) layouts. This makes it a good overall base for using when the tracking behaviour of longitudinal mode is not desired.
It can be used in a default install by direct URL launch to the /basic endpoint
instead of the /viewer endpoint.
Longitudinal (The Basic Viewer label in OHIF)
The longitudinal mode adds the tracking for measurements in the study browser
and in the measurements panel, and is otherwise identical to the basic mode.